人升开发日志#2 | 6/7 引导页
继续鸽需求文档,突然想要开始敲 Android 端的代码。
本文主要涉及到:
- ViewPager + Fragment 组合使用
- 沉浸式状态栏
- 页面指示器框架
- 使用 Lottie 框架显示动画
- ViewPager 的简单优化
- ViewPager 背景色渐变
- Android Studio 录制手机屏幕
先发一下最终效果:

ViewPager + Fragment 组合使用
引导页一般是多页设计,所以我们这里用到 ViewPager 来切换不同的 Fragment。
新建 Activity 的时候可以选择 Tabbed Activity 作参考。
里面实现了 ViewPager 和 Fragment 的组合使用。
毕竟不是教程文档,我们这里仅做简单解释。
首先是活动布局文件 activity_welcome.xml:
1 |
|
Fragment 布局文件:
1 | <LinearLayout xmlns:android="http://schemas.android.com/apk/res/android" |
以下是Java代码部分:
实现自己的 Fragment 类:
1 | public static class WelcomeFragment extends Fragment { |
实现 FragmentPagerAdapter :
1 | public class SectionsPagerAdapter extends FragmentPagerAdapter { |
然后在 Activity 的 onCreate 方法中加入:
1 | mSectionsPagerAdapter = new SectionsPagerAdapter(getSupportFragmentManager()); |
沉浸式状态栏
经过观察可以发现我们这样写布局,最上层就是 Fragment 。
只是将状态栏设成固定颜色的时候是行不通的,因为我们的多个页面不同颜色,滑动的时候状态栏颜色会是单独一块。
当然,解决办法很简单,只要将状态栏隐藏就可以了。
而且,我们不需要 ActionBar。
在 style.xml 中加入:
1 | <style name="AppTheme.NoActionBar"> |
我们在这里新建一个 theme ,并且让他继承自 NoActionBar,然后设置状态栏为透明。
这样会出现一个小问题:
整个布局的内容会向上移动顶到状态栏。
我们只需要在最上层布局元素加一个 android:paddingTop="25dp"即可。
页面指示器框架
指的是下面的小圆点,指示当前页面。
Google 的库中没有提供直接的实现,
如果自己弄的话要控制每个圆点的大小颜色也挺繁琐的。
所以,第一步当然是找一找有没有现成的轮子。
我们使用的是一个轻量级的框架CircleIndicator。
使用方法也很简单:
首先添加 Gradle 依赖
1
2
3dependencies {
compile 'me.relex:circleindicator:1.2.2@aar'
}activity_welcome.xml 布局中添加:
1
2
3
4
5
6
7
8<me.relex.circleindicator.CircleIndicator
android:id="@+id/indicator"
android:layout_width="match_parent"
android:layout_height="48dp"
android:layout_marginBottom="32dp"
app:layout_anchor="@+id/container"
app:layout_anchorGravity="bottom|center" />修改一下onCreate方法内的关于ViewPager的代码:
1
2
3
4mViewPager = (ViewPager) findViewById(R.id.container);
CircleIndicator indicator = (CircleIndicator) findViewById(R.id.indicator);
mViewPager.setAdapter(mSectionsPagerAdapter);
indicator.setViewPager(mViewPager); //这句一定要在viewPager设置Adapter写
使用 Lottie 框架显示动画
Lottie 是 Airbnb 出的一个开源动画框架,一个动画 json 文件就能在跨平台播放。
首先,添加Gradle依赖
1
2
3dependencies {
implementation 'com.airbnb.android:lottie:2.5.4'
}这个依赖内间接依赖了,
compile 'com.android.support:support-v4:27.1.1'。所以可能存在依赖冲突问题。可以统一版本来解决。
查阅官方文档,尝试添加动画。
最简单的使用方式就是将动画 json 文件放入 res/raw 中,然后在布局文件加入以下代码:
1
2
3
4
5
6
7
8
9
10
11<com.airbnb.lottie.LottieAnimationView
android:id="@+id/animation_view"
android:layout_width="350dp"
android:layout_height="350dp"
android:layout_gravity="center"
android:layout_marginTop="35dp"
android:paddingStart="50dp"
app:lottie_autoPlay="false"
app:lottie_loop="true"
app:lottie_rawRes="@raw/done" />这里以放入的 json 文件名为 done.json 为例。
那么还有一个问题,动画 json 文件哪里来呢?
- 可以用 AE 自己制作。
- 该网站上有开源供免费使用的 json 文件。
如果想要简单的修改颜色,可以用到 lottie-editor。
ViewPager 的简单优化
我们直接这样使用动画会发现会严重掉帧,特别是中间的页面。
这是因为 ViewPager 会自动缓存旁边的页面,并且动画一直在播放(?)。
我们这里做一些简单的优化操作:
在 Activity 声明
private WelcomeFragment arrWelcomeFragment[];,并且在 onCreate() 的时候保存下来。不用每次都new一个。同时在适配器里重写destroyItem(ViewGroup container, int position, Object object)方法,然后在里面什么都不做,让其不会再自动销毁。用代码的时候载入动画,同时将缓存策略设为 None。
1
2
3View rootView = inflater.inflate(arrFragment[iPage], container, false);
animationViews = rootView.findViewById(R.id.animation_view);
animationViews.setAnimation(arrAnimation[iPage], LottieAnimationView.CacheStrategy.None);改变播放策略,在转到该页再从零开始播放动画。
将所有
LottieAnimationView设为app:lottie_autoPlay="false"。在 Fragment 类中重写
setUserVisibleHint(boolean isVisibleToUser)方法:1
2
3
4
5
6
7
8
9
10
11
12
13
14
15
16
17
18
19
20
21
22
23
24
25
26/**
* 通过 Fargment 的可见性控制动画的播放与暂停
*
* @param isVisibleToUser
*/
public void setUserVisibleHint(boolean isVisibleToUser) {
super.setUserVisibleHint(isVisibleToUser);
LottieAnimationView animationView = null;
if (rootView != null) {
animationView = rootView.findViewById(R.id.animation_view);
}
if (animationView != null) {
if (isVisibleToUser && isCreate) {
//相当于onResume
animationView.playAnimation();
} else {
//相当于onPause
animationView.cancelAnimation();
animationView.setFrame(0);
}
}
}这里存在一个小问题,第一个 Fragment 在创建后不会调用这个方法。
所以第一个 Fragment 要在 onCreateView 的时候,就让她开始播放。
ViewPager 背景色渐变
渐变效果的实现主要参考了别人的代码。
1 | //ViewPager添加onPageChangeListener,实现颜色渐变效果 |
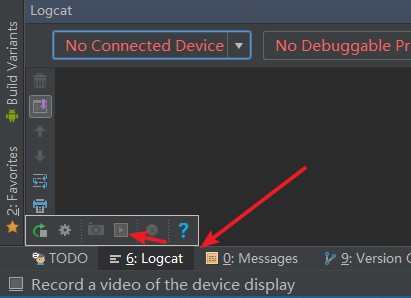
Android Studio 录制手机屏幕
一直没注意到 AS 有录制屏幕的功能,这次打算做 gif 的时候用到了。
搜索了一下说是在下方的 Monitor,但是找了半天没找到。
原来是改名为 Logcat 了。
具体位置在这里:
Push 到 Github 时遇到的小问题解决
一开始配置完 Git 和 Github 之后,发现 push 会失败。
这时候要去 Setting → Git SSH executable 设为 Native。
就解决了。
部分参考
人升开发日志#2 | 6/7 引导页